
Few things are more exciting than that first 60-degree day after a harsh winter, when you can finally break out the grill and… stare in disbelief at the rusty, charred mess in front of you. Before you admit defeat and order pizza, give that grill a good deep cleaning—you’d be surprised what a bit of elbow grease can do.
“People have a tendency to forget how old their grills are, and when the last time they cleaned it was,” says Kevin Kolman, head grillmaster at Weber. Over time, the inside of your grill gets covered with schmutz—a word he assures me is official barbecue terminology—which can result in inconsistent temperatures and a lack of adequate heat. It can also cause minor flare-ups and other performance issues. A quick cleaning once a month can help avoid such problems, but if it’s been a bit longer than that—don’t worry, you aren’t alone—you may want to go a bit deeper.
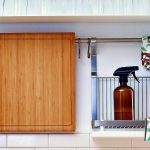
What you’ll need for your deep clean
The moment you rouse your grill from its winter hibernation is a great time to give it a thorough cleaning, so it’s ready for the season. To do so, you’ll need a few things:
- <b>A grill brush.</b> Kolman recommends buying a new grill brush every year. That way, you aren’t using a rusty five-year-old brush every time you fire up the barbie, and you can use last year’s brush for the early-season deep clean without worrying about ruining it. He likes <a href=”https://smile.amazon.com/Weber-6494-12-Inch-3-Sided-Grill/dp/B009IH0BYQ” target=_blank>Weber’s own 3-sided grill brush</a>—unsurprising since he works for the company—but <a href=”https://www.youtube.com/watch?v=3F0fRAPkn9U” target=_blank>so does America’s Test Kitchen</a>, so that’s what I used for this guide. Whatever you choose, make sure it’s a highly-rated brush from a trusted brand, since some cheaper ones can fall apart or strip the coating off your grates.
- <b>A paint scraper.</b> Either <a href=”https://smile.amazon.com/02250-Flexible-Putty-Knife-1-Pack/dp/B000LEDDDQ” target=_blank>metal</a> or <a href=”https://smile.amazon.com/Red-Devil-4718-3-Piece-Plastic/dp/B001SBJIA8″ target=_blank>plastic</a> should work fine, Kolman says—you just want something with a flat edge that will scrape debris off the inside of your grill.
- <b>Grill and grate cleaner.</b> A spray-on grill cleaner isn’t always necessary, but it can help make stubborn, burnt-on food easier to scrape off. I used <a href=”https://smile.amazon.com/Goo-Gone-Grill-Grate-Cleaner/dp/B008MMTE8M” target=_blank>this Goo Gone grill cleaner</a>, though <a href=”https://smile.amazon.com/Easy-Off-Professional-Oven-Grill-Cleaner/dp/B000JKCY8M” target=_blank>Easy-Off</a> is another popular option, and <a href=”https://smile.amazon.com/Grill-Cleaner-Spray-Professional-Degreaser/dp/B06XRRNM7X” target=_blank>Weber makes its own spray</a>, too.
- <b>A scouring pad.</b> A <a href=”https://smile.amazon.com/3M-pad01-Heavy-Scour-Green/dp/B001KYQBX0″ target=_blank>mild scrubbing pad</a> will help clean off some of the more stubborn gunk.
- <b>Dish soap.</b> You probably already have some in your kitchen—<a href=”https://smile.amazon.com/Dawn-Dishwashing-Liquid-Detergent-Cleaning/dp/B086RVNFCP” target=_blank>any decent dish soap</a> designed to de-grease should work fine.
- <b>Stainless steel and/or glass cleaner.</b> If your grill has a porcelain hood, you can clean it with any old glass cleaner and paper towel. For stainless steel hoods and side tables, though, you’ll want a more specialized stainless steel cleaner and polish like <a href=”https://smile.amazon.com/Weiman-Stainless-Steel-Cleaner-Polish/dp/B01NAWQB33″ target=_blank>this spray from Weiman</a>.
- <b>A microfiber towel.</b> Again, if you have any stainless steel parts, <a href=”https://smile.amazon.com/AmazonBasics-CW190423-24-Pack-Microfiber-Cleaning/dp/B009FUF6DM” target=_blank>a non-abrasive cloth</a> will help prevent cleaning-related scratches.
Get fired up—let’s do this
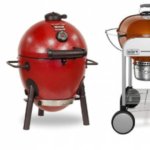
Once you have the necessary tools, it’s time to open up your grill and marvel at the disgusting state you left it in. We got our hands on a particularly neglected grill for this demonstration; hopefully yours looks a little better.
If your grill runs on gas, make sure its fuel supply has been turned off at the source—that little knob should always be shut when your grill is not in use—and survey the damage. (If you’re using a charcoal grill, the advice about some components—like burners—obviously won’t be relevant, but the rest of the guide should suit you well. Just follow the parts that apply to you.)
1. Remove the grill grates, along with any heat-dissipating panels and other easily removable parts. Weber grills often have a set of “flavorizer bars” above the burners that you’ll want to remove, for example. These parts may have a decent amount of rust, but as long as they don’t come in direct contact with food, that’s okay. We’ll still give them a good clean, but you aren’t likely to get them back to their original steel shine. “As long as the burners and bars do not have holes or pitted areas, these parts will work just fine,” Kolman says. “Issues occur when they are pitted, have holes and are breaking apart.”
2. Put some of your dish detergent in a large bucket and fill it with warm water. Toss in the grates, heat panels, and flavorizer bars and let them soak for a few minutes. (I didn’t have a bucket big enough to fit everything, so I used the lid to my kid’s old plastic sandbox. Whatever works, right?) If your grates are made of bare cast-iron instead of stainless steel, you don’t want to soak them—it can ruin the seasoning. Leave them aside for now.
3. Get brushing. While the removable parts soak, take your grill brush and give your burner tubes a once-over, making sure there isn’t any debris blocking the holes in the burner. Brush across the tubes, rather than along the length of each one—you don’t want to push debris into the holes as you go, as it can block the flame or clog the burners. Again, don’t worry if these are a little rusty—that’s normal.

4. Go back to your soapy bucket and give your steel components a good scrub with your scouring pad. If you need a bit of extra cleaning power, spray them with some grill and grate cleaner, let it sit for a moment, then scrub away. Be sure to rinse these parts with clean water when you’re done, then dry them with a rag.
5. Turn your attention to the grill itself. Start by checking the lid. If you see any flakes peeling along the inside, don’t panic: It’s not paint. “Because of the heat or moisture humidity inside there, the smoke has a tendency to bake itself onto the inside of the lid, and it’ll start to sheet itself off,” Kolman says. You can easily take your putty knife or grill brush and scrape away all that carbonized grease. It’s okay if it falls into the cookbox, because we’re about to clean that, too.
6. Check out the cookbox. There’s a good chance you have a lot of grease and food residue in the cookbox along the bottom of your grill. If so, grab a shop vacuum and clear out all the loose debris you can. (If you don’t have one, you can shovel some of it out yourself, but a small, relatively inexpensive shop vac goes a long way.) If there’s any debris caked on the bottom of the cookbox, grab your paint scraper and scrape it off. If it’s really fossilized, spray your grill cleaner, let it sit, then scrape again, pushing all that nasty stuff into the hole that leads to the drip tray. You can then slide the grease tray out and give it a good cleaning, too, brushing any debris into the trash. Wipe off any remaining cleaner with a wet paper towel.

Finishing up
No matter how much you scrub, your grill will probably never look like it did the day you bought it, and that’s okay. The goal isn’t to get it looking shiny brand-new—your goal is to remove large deposits of grease and charred food that can negatively impact your grill’s performance. Don’t feel like you need to replace your grill just because it has signs of use—consider them a badge of honor!
You may, however, have to replace some components here and there—like, as Kolman mentioned, heat panels that have cracks or holes in them. And if your cast-iron grates are rusted to hell like the ones on the run-down model we cleaned, you can either strip and re-season them, or just grab some new ones—we opted for the latter. (You can replace them with stainless steel if you want something a bit lower-maintenance, though the grilling ability of stainless steel versus iron is a debate all its own.) If your grill’s manufacturer doesn’t sell replacement parts for your particular unit, Grillparts.com is a great resource for tracking down hard-to-find pieces, and third-party vendors such as GrillGrate offer their own cooking surfaces for a variety of grills.
You may also find, once you fire up your grill, that your burners still need some extra love. One of mine was producing a large yellow flame rather than the more desirable small blue flame, which can indicate that it needs to be completely removed and cleaned with a bottle brush (or replaced entirely). Make sure everything is lighting up, too. If you’ve only got fire halfway along the length of the burner, you may have a clogged hole or two that you need to poke through with a pin.
When all the important stuff is done, feel free to clean the stainless steel on the outside as well. “Spray on the cleaner and let it sit for five minutes, because you need time for that cleaner to start to activate,” Kolman says. “Then take your microfiber towel and wipe with the grain.” He notes that you should avoid paper towels on steel, lest you scratch the finish. A porcelain lid is much more forgiving, and you can just use glass cleaner and paper towels for that. Clean any plastic parts with soap and water, and you’re ready for the first burgers of the season.
How to maintain your grill as you go

After buckling down for a deep clean, you’ve hopefully resolved to not ever let your grill get to such a sorry state again. Thankfully, Kolman has a few tips for making that happen.
“Every month, I think it’s a pretty good rule of thumb to take a look at the inside of the grill and clean up the flavorizer bars and grates,” he says. A bit of occasional scraping with a putty knife will help keep your grill operating at peak performance.
Kolman also recommends brushing the grates before you cook, not after. “Preheat your grill for 10 to 15 minutes, get the grates extremely hot, and any excess debris you have on there is going to get burned off.” Then just brush it away. He says brushing after you cook is more likely to gunk up the bristles of your brush.
These days, many people prefer wooden paddles instead of metal-bristled brushes for those in-between cleanings—that way you don’t get metal bits falling off into your food. America’s Test Kitchen didn’t see any issues with this in their durability tests, but they did find that a bristle-free metal brush like this one was more effective than a wooden paddle.
You should also empty and clean the drip tray regularly, Kolman says. “The more stuff you have down there, the less the grease is getting out, the more chance you have some minor flare-ups.” He says once a month is probably fine for most people, but if you do a lot of grilling, once every two weeks may be better. And for heaven’s sake, keep the grill under a cover when you aren’t using it, to protect it from the elements.
Kolman also recommends checking the gas connections regularly, especially if you’ve gone a few months since you last used your grill. Put a little soapy water around the gas fittings and turn the gas on. If the soap starts to bubble and move around, you’ve got a leak, and you’ll need to replace the component or have a professional check it out.
Other than that, don’t get too concerned about how your grill looks—it’s all about how it performs. Using your grill will naturally change the color and appearance of its interior, and that’s okay. It means you’re putting it to good use. A little maintenance goes a long way, and if you do a quick cleaning of the cookbox once every few months, you won’t have to go quite as hard every time you bring the grill out from its snowy slumber.
Related posts:
 The Best New Cookbooks for Fall 2019
 How To Make Your Own All Purpose Cleaner That Actually Works
 How to Deep Clean Your Kitchen with Expert Tips for Efficiency

 Gas Versus Charcoal: Summer’s Most Important Decision
 63 Things To Never Throw Away For DIY Junkies [2nd Edition]
 What Is the Difference Between Types of Grills?
 The 25 best MasterClass classes to take when staying at home
 BBQ 101: How to Grill for Beginners
 How to Grill Pizza
 The Best Last-Minute Food Costumes for Halloween
 7 Best Electric Toothbrushes For Kids in 2019
 The meal prep plan you need for easy gluten-free dinners all week
 30 Best Going Away Gift Ideas
 How to Take Boxed Cake Mix From Basic to Baller
 How to Grill Lobster Tails, Shrimp, Oysters, Crabs, and Other Shellfish