Read on for the best in DIY fitness. Call us when you can pull 30 in a row.
RELATED: 687 DIY Outdoor Projects | The Ultimate List
In this article:
How to Make a Bombproof Pullup Bar | DIY Fitness
Build an Indoor DIY Pullup Bar
You’ve probably been thinking about how to make your own pullup bar for awhile now, haven’t you? After all, nothing says strength like strength of intellect, and nothing says strength of intellect like figuring out how to screw together a bunch of big-ass metal pipes and bolt them to your wall when nobody is looking.
Supplies You Will Need for This DIY Pullup Bar

- 1-inch diameter threaded metal pipe at 36-inches in length
- (x2) 1-inch diameter threaded metal pipe at 24-inches in length
- (x4) 1-inch diameter floor flanges
- (x4) 1-inch diameter 90-degree elbow connectors
- (x2) 1-inch diameter T-connectors
- (x4) 1-inch diameter threaded nipple connectors at 4-inches in length (these determine how far out from the wall your pullup bar will sit. We used 4-inch long connectors, which worked perfectly over our door frame. You could just as easily go shorter or longer, though I would resist going anywhere beyond 6-inches in length with these connectors because you will be putting quite a bit of stress on them while doing all those pullups)
- (x2) 1-inch diameter nipple connectors at 1.5 inches in length (these are typically the smallest length connectors you can readily get at your standard hardware store)
- Drill
- (x16) 2-1/2-inch exterior screws (length is flexible but go as long as you can without busting through the other side of your wall. Don’t use cheap drywall screws for this!)
- Level
Instructions
Step 1: Thread Your Elbows

Grab one of your 24-inch long pipes and thread a 90-degree connector onto either end. It does not matter which end you begin with.
Just hand-tighten these and all of your subsequent connectors down, you don’t need to go crazy tightening them.
Step 2: Thread a Nipple to a Flange
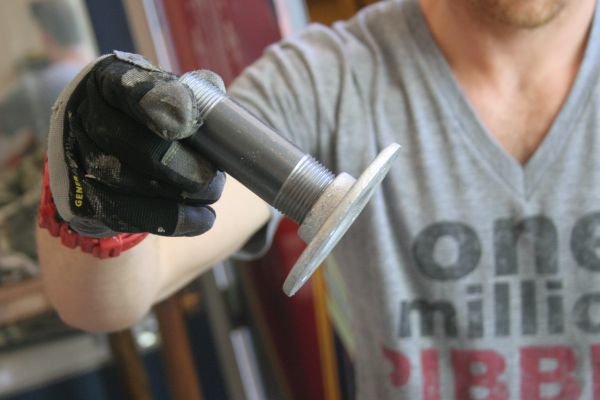
Take one of your nipple connectors (we used 4-inch-long ones, see below). And thread that into one of your floor flanges.
Step 3: Add Connector to Pipe
Take the flange with the nipple connection on it, and thread the other end of that nipple into the 90-degree fitting on your 24-inch pipe. I wonder how many times I can say “nipple” in this post?
Step 4: Repeat Steps 1-3 with Second 24-Inch Pipe
Do exactly what you just did with your second 24-inch pipe, threading it with an elbow and connecting a nipple+floor flange to that elbow. You will end up with two pipes that look like the image above.
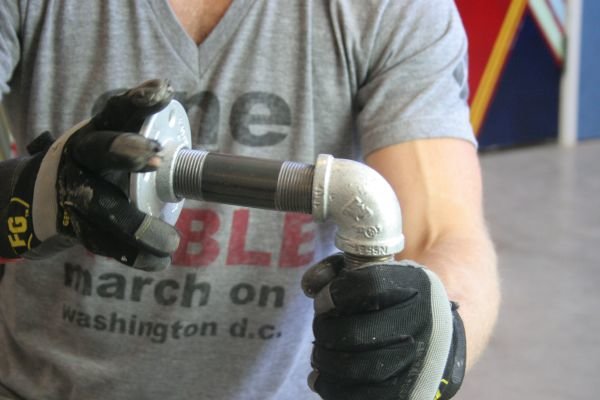
Step 5: Add Some T’s

Take your T-connectors and screw them down to the other ends of your 24-inch pipes. Attach the T’s from the center thread as shown below.
I look like I am about to punch myself in the eyeballs. Do this to both 24-inch pipes.
Step 6: Elbows for Main Bar
Now it’s time to grab another one of our free elbows and one of the smaller, 1.5-inch nipples that we have. Screw that nipple into either end of your 90-degree elbow.
Do this twice, so you have two 90-degree elbows ready to screw. Create two separate elbows with widdle nipples that look like this. Awww…
Step 7: Elbows to Main System

Now take those elbows and screw them into the top opening on your T-connectors. You want to screw them in so that the elbows face each other on each bar (because your 36-inch bar is going to go between them).
Confused? Please, that’s why we have pictures!
RELATED: 22 Easy Woodworking Projects You Must Try
Step 8: Add 4-Inches to T

At this point, we only have one remaining opening on each of our T’s to fill, which is the opening currently lying on the ground on the right side of the above image.
Take your remaining two 4-inch pipes and thread them into each T. And add one more flange to both.
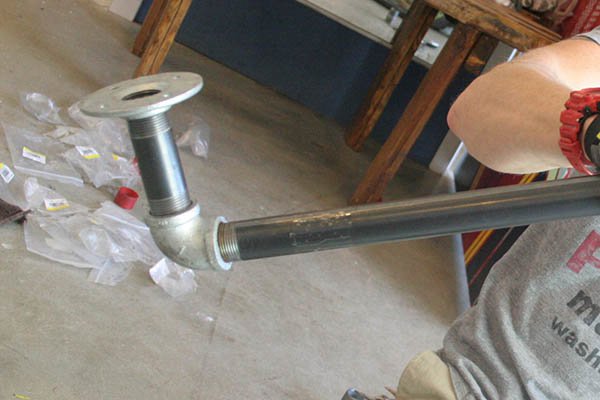
Step 9: Adding Center Bar

At this point, we are almost finished. We just need to add our center bar to the system and we’ll be banging out pullups in no time.
Lay your pipe configuration down like this so you can follow along.
See those two lovely 90-degree elbows facing each other? We need to screw something into those!
Pull out that 36-inch bar and thread it into either of the available elbows.

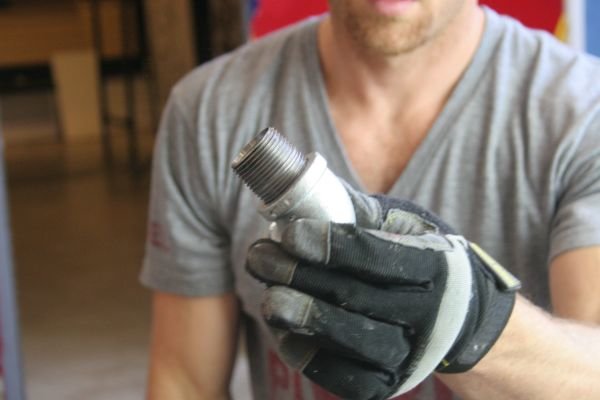
To attach the other end, we need to get a little more graceful. Because this is a fixed system, we can’t just screw the other side into the remaining 90-degree elbow.
So what we need to do is actually screw the elbow (and everything it is attached to) into the 36-inch bar. To make it easier, put the end that is already screwed down on the floor.
Then, with your foot on the fixed end, thread the entire second section onto the 36-inch pipe. Little tricky, but once the threads catch you’ll be good to go!
Keep working around with the top bar until it is nice and tight.

Step 10: Ready to Mount!

Alright, looking good. Our system has four flanges to connect to the wall, two side bars to spread out the load, and a center bar ready for pullup-ing.

Grab your drill and sixteen screws (four for each flange) and head on over to your wall.
NOTE: Pullup bars take a lot of weight, especially if you flap around like a dying whale on them like I do. When mounting this system (or any pullup rig) be sure you are attaching it to something strong!
If you have drywall on your walls, make sure you find the studs and go into them with your screws. We lucked out in the DIY Projects studios because we were mounting this over a custom doorway that had studs running up behind the drywall on either end of the door (it was built by the previous tenants, don’t diss on the construction).
Our 36-inch bar fits perfectly over the studs extending from the top and side of this doorway. If you have drywall to contend with, it’s likely (if the room was built to code) that your studs are spaced 16-inches on center.
If you cannot find the studs or don’t want to be limited by stud width, you can also affix supports against the wall before mounting your pullup rig. I threw some 1x6s up so you could see how that might work even though we didn’t need them.
If you put several big drywall anchors into these faceplates (properly), the weight would be spread out enough to hold the average dude. No promises if you’re built like Andre The Giant.

- If you face your drywall with wood and anchor it well up the wall, it will provide a solid base for making a DIY pull up bar at home. Only do this if you know how to embed beefy drywall anchors.
- Better yet, find your studs and make your rig the right width to correspond with anchoring it to your studs behind the drywall.

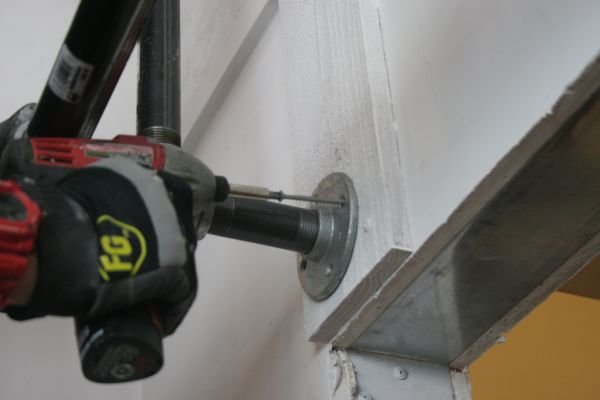
Step 11: Anchor Top Right and Bottom Left

You can actually mount this in any order you want, but I find it easier to do it in this sequence.
Put the top right flange of your system up where you want it against the wall. And put in your four screws.

Now before I mount the bottom left, I want to make sure my bar is level.

So I place my level up on the 36-inch bar until I’ve got my purty bubble in the middle. And then I can mount the bottom left flange.
Step 12: Finishing off Your Mounts

At this point, our rig is firmly in place on both the upper right and bottom left flanges. Now we just want to make sure everything else is straight before we finalize mounting.
Still working on the left side, place your level on the 24-inch bar and check where you are in terms of vertical straightness. Once it looks good, go ahead and lock in the top left flange with four screws.
Step 13: Finish off Any Remaining Flange Screws

From here, we just need to go around and make sure everything is mounted firmly against the wall. We ran into a bit of trouble getting our last flange screws in, so I Macgyver-ed a little bit extender to squeeze into the space.
You can buy long bit extenders, but you can also double (or triple) them up in a pinch. It’s not what you got, it’s how you use it!
Get in there yah little bugger!
Step 14: Feel the Burn!

Our DIY pullup rig is now successfully in place. The only thing left to do now is… hang coats off it.
Wait, hell no, time to do some good ol’ fashioned pullups! I like this type of shot because you can’t see the ladder I am standing on.
Wear head protection as dictated by your IQ level. MOMMY! MOMMY!
Now check out the video on Building an Outdoor Pullup Bar below. Thanks to HomeMadeModern we get to check the difference and compare:
Like most tutorials, these DIY instructions on building a pull up bar with pipe will leave plenty of room for variation. The great thing about this bombproof model, however, is it is built with FOUR separate anchor points, giving lots of redundancy to the system.
This ensures it doesn’t rip out while you’re showing off your one-arm pullups to that special someone… and end up with a cranial injury that leaves you dribbling from a sippy cup and unable to pronounce your own name for the rest of your life.
We’re you able to find this DIY Tutorial helpful? How most likely would you think you’d recommend this tutorial? Give us a comment below!
UP NEXT:
- DIY Vacuum Grabber Tool | Robotic Arm Plans | Fun Projects
- 33 Quick And Easy DIY Home Projects You Can Do This Weekend
- Best Christmas Cookie Recipes | 16 Favorite DIY Christmas Cookies
Editor’s Note: This post was originally published on May 13, 2014, and has been updated for quality and relevancy.
The post How To Make A Bombproof Pullup Bar | DIY Fitness appeared first on DIY Projects Craft Ideas & How To’s for Home Decor with Videos.
Related posts:
 Rain Chains: A Fun & Effective Alternative To Gutters
 Save space by building this simple cutting board rack inside any door
 20 Cool Home Decor Wall Art Ideas for You to Craft
 400+ Best DIY Christmas Projects You Should Make This Year
 63 Things To Never Throw Away For DIY Junkies [2nd Edition]
 DIY Wall Art You Can Make In Under An Hour
 21 Fall Door Decorations | DIY Wreaths, Door Hangers, And More
 How To Make A Paracord Bracelet: Blaze Bar Quick Deploy
 Brighten Your Child’s Day with These DIY School Supplies (EASY)
 The DIY Garage Clutter Buster Guide [Infographic]
 DIY Pallet Adirondack Chair You Can Do For Your Backyard
 3 Triceps Workouts: The Secret to Awesome Arms and Super Strength
 How To Make A Minion Costume | DIY Costume Plans
 Most Affordable Garage Wall Storage Kits We Found On Amazon
 22 Handmade Calligraphy Christmas Cards You Can DIY
 How To Build A DIY Cat Tree For Your Feline Friend