There’s nothing more satisfying than enjoying the fruits of your own labor. Brewing your own beer can be quite daunting for a beginner. Don’t worry! These homebrewing tips will guide you before, during, and after the process.
RELATED: How to Make Beer | Home Brewing Instructions
Homebrewing Tips to Make You Go From Novice to Expert
Tips Before Homebrewing

1. Don’t Start off Strong
There’s a myriad of possibilities when it comes to making your own beer. For starters, you have complete control of what you want or don’t want to include. This freedom, while it gives you a bigger space to move, may also compel you to take on something beyond your skill level.
Start with a simple recipe and work your way from there. Improving at a gradual pace helps to build your skills and allows you to fully understand every detail in the process.
2. Learn Your Recipes Beforehand
|
It’s easy to overlook the importance of learning the recipe. After all, you’ll be guided by it throughout the process. The thing is, homebrewing requires a bit more attention to detail. While one small mistake may lead to minuscule effects, every step in making your own beer is still a crucial one. That said, learning the recipe beforehand will help keep you from making mistakes, especially the ones that could’ve easily been avoided.
3. Don’t Use Bleach
Sanitation and sterilization are very important in the art of beer crafting. Anything that touches your beer, especially during the cooling process, is subject to proper sanitation. Now, there are a lot of sanitizers that can be used. Bleach is one of the most popular products used for this. While it’s cheap, easy to find, and extremely powerful, it’s not ideal.
Rinsing off bleach is harder than it appears to be. Plus, it takes too much time and wastes too much water. Stick to no-rinse sanitizers like Iodophor or Star San.
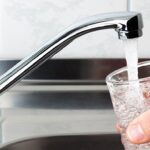
4. Use Filtered Water If You Can
Water is a big part in homebrewing. Most homebrewers use tap water since it’s an easy source, and a lot of people drink it anyway. Tap water, as drinkable as it is, may contain things (e.g. chlorine) that can contaminate the taste of the beer. Although you can still use it, choosing better quality water can make a big difference in the end result.
Filtering can be as simple as attaching a filter to your faucet. Spring water is also a great contender to filtered water.
5. Figure Out the Legality of Homebrewing in Your Area
This one isn’t as much of a tip as it is a reminder. Homebrewing is generally okay for home and personal use, but it should also be considered that limitations to beer craft exist. While it’s legal in all 50 states of the US, the same cannot be said in other countries. For example, it’s illegal to homebrew in Malaysia and Ukraine.
Before you start exploring your talents in crafting beer, make sure you’re even allowed to do so. Read more about Homebrewing Laws here and here.
RELATED: Make Your Own Green Beer For St. Patrick’s Day
Tips During Homebrewing

1. Use Dry Yeast Packets
While it’s better to make your own yeast starter, you probably wouldn’t want to be overwhelmed by additional things to create. Dry yeast packets are easy to hydrate and can be done on the day of your homebrewing. These are absolutely perfect for beginners. You can work your way to making your own starter when you have a proper grasp of the process.
2. Boil Your Wort for at Least an Hour
The process of boiling the wort allows it to be sterilized, to vaporize unwanted compounds, and to help your beer taste better. Some recipes call for a minimum of 15 minutes of boiling time. Since you’re practically going to age this beer, it’s important that you’re able to kill off as much bacteria as you can.
Boiling your wort for at least an hour is an easy tip to ensure that sanitation, vaporization and flavoring occur.
3. Invest in a Wort Chiller
The risk of contamination is higher during the cooling process. That said, the faster you can cool your wort, the better. While it’s okay to submerge your kettle in an ice bath, it won’t be as quick to fend off bacteria than a wort chiller. Immersion wort chillers are affordable upgrades to ice baths. They are easy to clean and sanitize. They’re also simple to set up, with one adapter attached to your faucet.
Check out this immersion wort chiller and its water efficient counterpart.
4. Don’t Close the Lid
Boiling allows the unwanted chemicals to vaporize and evaporate from your beer. Closing the lid stops this from happening and keeps them in the beer. But you don’t have to fully remove the lid while you boil. Leaving space for steam to escape is enough.
5. Leave a Proper Head Space When Bottling Your Beer
Once you’re beer is fully fermented, you’re ready to bottle them. Bottles need a proper head space to make room for carbonation. Make sure to leave about 1 – 1.5 inches of head space in the bottle’s neck.
RELATED: How to Make Beer at Home | Best Homebrew Recipes
Tips After Homebrewing

1. Make Sure to Use Brown Bottles
Ever wondered why most beer bottles are brown? This isn’t a stylistic choice, per say. Light, especially sunlight, is one of the beer’s enemies. The ultra-violet rays alter the flavor of your beer, making it sour. This has been dubbed the “skunky beer”.
The best way to avoid this is to choose a brown bottle, which absorbs the wavelengths that cause this sour reaction from the beer. Read more on the effect of light on beers in this article.
2. Store Your Beer in a Cool and Dark Place
The newly-finished beer is sensitive to light and heat. These two complicate the fermentation and may cause additional pressure to the bottle itself. If more pressure builds up, this may cause the unfortunate case of the “Bottle Bombs”. Not only is it a waste of your hard work, but it’s also extremely dangerous.
That being said, give your beers at least two weeks before putting them in the refrigerator.
3. Give Your Beer a Few Extra Days/ Weeks Before Opening
It’s extremely tempting to get a taste of that beautiful homemade beer. But like all good things, good beer will come to those who wait. Once the suggested time period for waiting is over (typically, five weeks), good beers will come waiting for you. But if you wait a few more weeks after that, great beers will be in their place.
Homemade beer can have a shelf life of up to a year, depending on how well you stored them. Go ahead and wait. That beer’s not going anywhere, anytime soon.
4. Don’t Forget to Properly Store Your Ingredients
Homebrewing is a tedious task. Once you finish, it’s tempting to just shove your ingredients and tools to god-knows-where, and call it a day. But it’s extremely important to store them the proper way. Your beer’s quality depends on its ingredients. You may have bought the highest quality ingredients known to man, but those can easily degrade through improper storage.
5. Keep a Record
Record-keeping keeps all your beer-making endeavors in check. One obvious thing to take note of is the recipe you used. Of course, there are more things you can take note of other than recipes. You can also take note of the steps in the process that are open for improvement. This can also include the techniques you may have developed along the way.
Keeping record is a great way in keeping track of your progress and discoveries.
Want to enjoy your very own beer? Watch this video by Joshua Weissman and brew your first homemade beer:
The art of homebrewing is as tedious as it is fulfilling. It may be easy to go to your local stores and grab a crate of beer, but in the end, that beautiful bottle of homemade beer is definitely worth the blood, sweat, and insane amount of waiting time.
Do you have your own homebrewing tips and tricks? Let us know in the comments section below!
UP NEXT:
- How to Make Beer Bottle Glasses
- Uses For Beer Bottles | 24 Creative Projects And Cool DIY Ideas
- How To Make Survival Paracord Bracelets | DIY Projects
Calling all crafting DIYhards, DIY Projects needs YOU! Click here if you want to contribute for us.
Don’t forget to stay connected with us on Facebook, Twitter, and Instagram!
The post 15 Homebrewing Tips Every Beginner Must Know appeared first on DIY Projects Craft Ideas & How To’s for Home Decor with Videos.
Related posts:
 Homebrewery Guide: Everything You Need To Know Before Brewing Your First Beer
 Is Mineral Water Worth the Extra Cost? Find out Here
 Water Intoxication: How Much Water Is Too Much?
 What You Should Know About German Beer
 The Must-Attend American Beer Fests of 2019
 Tap Water Toxicity: Widespread Contamination Impacting Millions
 19 Super Cool Wine Bottle Crafts and Ideas To DIY
 63 Things To Never Throw Away For DIY Junkies [2nd Edition]
 400+ Best DIY Christmas Projects You Should Make This Year
 20 Cool Ways to Use STONE For DIY Projects in 2016
 The Best Low-Carb Low-Cal Beers for Summer
How To Cut Bottles With String & 5 DIY Projects Using Cut Glass Bottles
The Best Low-Carb Low-Cal Beers for Summer
How To Cut Bottles With String & 5 DIY Projects Using Cut Glass Bottles
 Brew Up a Pot of Beer Chili Based on Your Favorite Style of Ale or Lager
 20 Simple Sewing Projects That Any Beginner Can Make